Snickers Salad Recipe | Apple Banana Pudding Treat.
Open your pantry and you’re bound to find a pudding mix or two. Put them to work making this recipe.
Get this: Candy, fruit, and pudding make delicious bedfellows. The Snickers Salad blends scrumptious Snickers, delectable fruit, and tasty vanilla pudding. This works perfectly as both a snack and a dessert!
1 C. milk
1 3 oz. pkg. instant vanilla pudding
1 8 oz. container whipped topping
1 to 2 Snickers
1 to 2 Granny Smith apples
1 to 2 bananas
Empty 3 oz. package of instant vanilla pudding into mixing bowl. Add 1 cup milk and stir two minutes.
Take the 1-2 bananas, remove the peel, and slice into small pieces. Do not do this very long before serving, as the fruit might discolor.
Take the 1-2 Granny Smith apples and chop into small pieces.
Take the 1-2 Snickers and cut them into small pieces.
Add 8 oz. of whipped topping to the vanilla pudding, stirring it in thoroughly but gently. When ready to serve, add the bananas, apples, and Snickers pieces, mixing them in.
If desired, add any remaining pieces of Snickers on the top as a garnish.
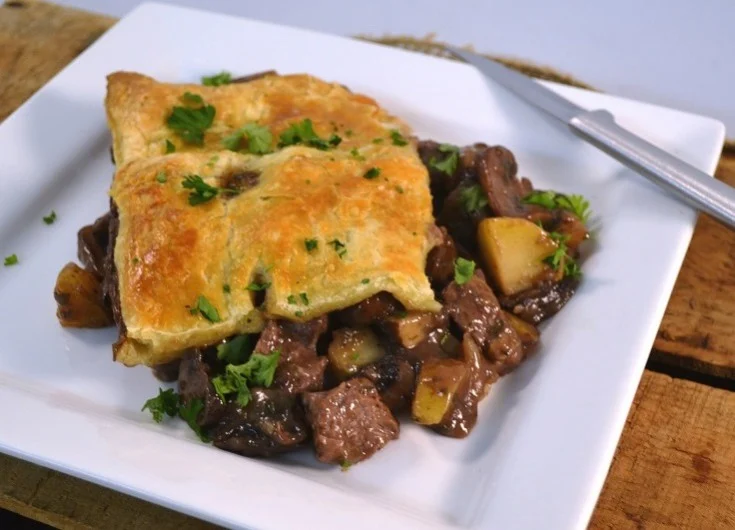
Learn how to make this Steak and Mushroom Pot Pie for an incredible meal you’ll never forget! A flaky pastry crust, juicy steak, buttery potatoes, and succulent mushrooms make this a wonderful dinner the whole family will love. Follow the written or video instructions below to make this wonderful dish.
Ingredients you will need:
1 cup onions
1 package “baby bella” mushrooms, sliced
burger and fry seasoning, to taste
2-3 lb. sirloin steak
fresh Parsley, chopped
1 bottle red wine
1 T. beef base
1 tsp.Worcester sauce
4 Yukon Gold potatoes, boiled and cubed
Parsley, chopped
Thyme
3 garlic cloves, chopped
Cracked black pepper
Puff pastry
Extra virgin olive oil
1 egg, beaten
1 T. cornstarch
Water
Instructions.
Preheat oven to 400 degrees. Add seasoning to 2-3 lb. sirloin steak.
In a skillet add extra virgin olive oil, cook sirloin steak 3 to 4 minutes on each side, forming a nice crust. It’s OK if the steak is a bit rare, as it will continue cooking in the oven. Once the steak is done, do not discard the liquids on the pan.
Chop 1 cup onions, 1 package “baby bella” mushrooms, and 3 cloves garlic.
In another pan pan coated with extra virgin olive oil, saute` the mushrooms, onion and garlic until tender and translucent, about 5 minutes; stirring as you cook.
Cube 4 boiled Yukon Gold potatoes.
Pour a small amount of red wine into the pan that was used to cook the steak and cook down for 2 to 3 minutes. Pour this mixture iinto the pan with the mushroom mixture. Add another 1/2 to 1 cup red wine.
Add 1 tablespoon beef base and 1 teaspoon Worcester sauce to the vegetables. And continue to cook until slightly reduced.
Cube the sirloin and and add to the bowl of cubed potatoes.
Add thyme and black pepper to the mushroom mixture which should be somewhat reduced.
Whisk together 1 tablespoon cornstarch and 1 tablespoon cold water and add the mushroom mixture.
Stir constantly and bring to a simmer until thickened.
Add fresh chopped parsley to your liking. Add potatoes and meat to the gravy. Combine.
Spread the mixture evenly in a 9″ by 13″ pan.
Cover with thawed puff pastry. Brush the pastry with beaten egg. Poke vent holes in the pastry. Bake for 45 to 50 minutes or until puffy pastry is puffed up, browned, and filling starts to bubble.
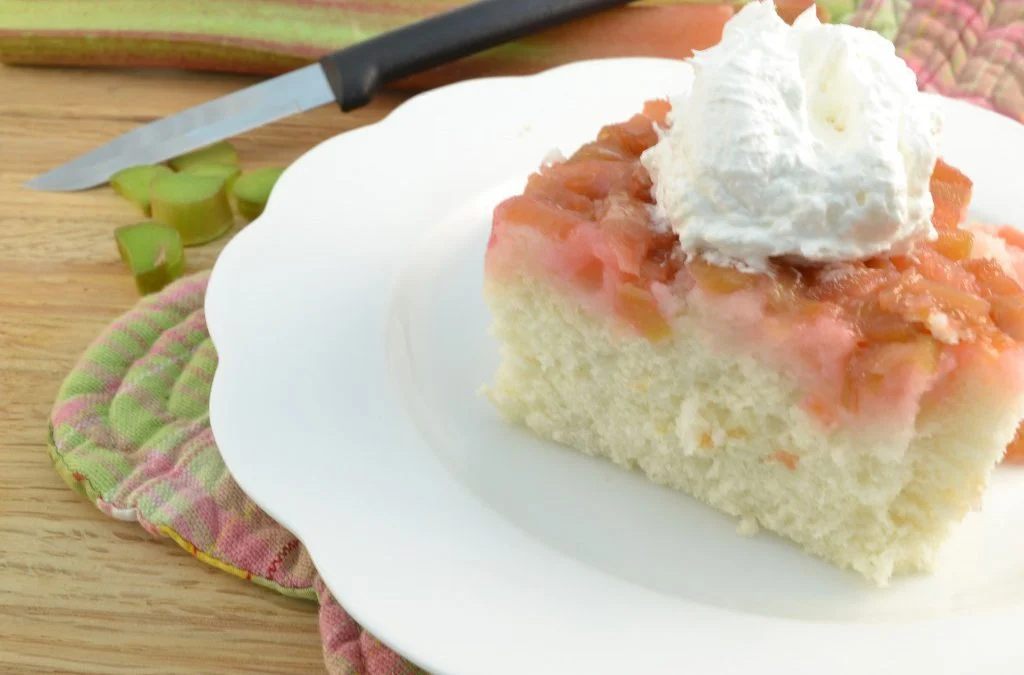
Make this incredible rhubarb upside-down cake for a delicious dessert that deceptively simple to make! Everyone will love it, especially when you serve it with some frosty ice cream or a heavenly dollop of whipped topping!
Getting a head-start with cake mix makes this Rhubarb Upside-Down Cake recipe a breeze to throw together!
Ingredients you will need:
1 cup sugar
Eggs, oil, and water as directed on cake mix
6 tablespoons butter, melted
Whipped cream or vanilla ice cream, optional
Red food coloring
4 cups finely diced rhubarb
1 (18.5 ounce) package white cake mix
Preheat oven to 375 degrees. Finely dice 4 cups rhubarb. Place in mixing bowl or dish.
Add 1 cup sugar.
Add 6 tablespoons melted butter.
Add several drops red food coloring.
Mix.
Place rhubarb mixture into a lightly greased 9″ x 13″ pan. Spread rhubarb mixture equally.
Add 1 package prepared white cake mix to top of rhubarb mixture. Place in oven. Bake for 35 minutes.
Remove pan from heat. Loosen edges and carefully invert onto a large platter. Serve your Rhubarb Upside Down Cake warm or cold, topped with vanilla ice cream or whipped topping. Enjoy!
According to the National Sleep Foundation, more than half of American adults do not get enough sleep and 82% wish they could get better sleep. Late-night snacking on low-fiber, high-fat foods such a dish of ice cream, a left-over slice of cheesecake, or a chocolate-covered donut may sound appealing, but they’re all associated with lighter, less restorative sleep. And although a glass of wine or beer before bed may make you feel sleepy initially, alcoholic drinks are known to cause disruption in sleep.
However, eating certain fruits before bedtime can significantly improve your sleep quality. Fruits like cherries, bananas, pineapples, and grapes contain natural compounds that help regulate sleep patterns.
• Tart cherries. According to mindbodygreen, tart cherry juice contains magnesium and some melatonin that promotes calm and boosts sleep. It also contains tryptophan, an amino acid that boosts melatonin, a hormone that your brain produces in response to darkness. Melatonin helps regulate your circadian rhythms (24-hour internal clock) and promotes sleep. Sip on 8 to 16 ounces of 10% tart cherry juice at night to reap the sleep-inducing benefits.
• Bananas. This common breakfast food is rich in tryptophan, which makes it an excellent bedtime snack. A study published in the Asia Pacific Journal of Clinical Nutrition found that people who ate a banana before bedtime had improved sleep quality. One medium banana also contains 32 milligrams of magnesium, which is known to promote relaxation.
• Pineapples. In a study published in the Journal of Agricultural and Food Chemistry, eating pineapple was found to boost melatonin levels by a whopping 266%. Have a few slices at least an hour before you go to bed or make a small smoothie with milk or yogurt. Dairy foods are also rich in tryptophan, which further promotes a good night’s sleep.
•Grapes. According to TODAY, naturally sweet and heart healthy grapes also contain melatonin to help regulate the body’s sleep-wake cycle. Instead of ending the evening with a sugary or rich treat, like ice cream or cake, try munching on a bunch of fresh grapes.
To make your snack more nutritionally balanced, you can pair the fruit with dairy or nuts. For example, have a glass of milk with your banana or make a peanut butter sandwich using grapes instead of jelly.
You make the call. Recalls are Rising: The Top 10 Riskiest Foods.
If you are concerned by the number of food recalls in the news, you’re not alone. There was a 41% increase in food recalls in 2024 due to contamination with salmonella, E. coli, and listeria, according to the U.S Public Interest Research Group Education Fund.
In addition, confirmed cases of foodborne illness rose by 20% and related hospitalizations and deaths more than doubled, says Consumer Reports. Tens of millions of Americans suffer illness from foodborne bacteria every year reports the Centers for Disease Control and Prevention.
Here are CR’s top 10 riskiest foods:
Deli meat. The largest instance of foodborne illness caused by listeria in liverwurst in a Boar’s Head plant led to a recall of 7 million pounds of all types of cold cuts by the company. Boar’s Head announced it would no longer make liverwurst as a result. CR says that people at high risk for listeria infection — older people, pregnant women, or children under the age of 5 — should skip deli meat altogether unless it’s served piping hot to kill harmful bacteria. Prepacked cold cuts may be a safer option.
Cucumbers. Whole cucumbers and sliced cucumbers were recalled in separate incidents in 2024. These vegetables can be contaminated by bacteria from animal waste in the soil or irrigation water. When buying any fruit or vegetables, select those with skins intact and not bruised or broken. Washing and peeling can reduce the bacteria but not eliminate it altogether, says CR.
Raw milk and cheese. In 2024, unpasteurized products from Raw Farms were linked to salmonella and E. coli as well as bird flu. Raw milk tends to be at a higher risk for contamination due to the absence of pasteurization, which kills harmful bacteria. Consumers are advised to seek pasteurized alternatives to mitigate the risk of illness.
Soft cheeses. A routine test detected listeria in cotija and queso fresco cheeses at Rizo-Lopez Foods. The company recalled these and other dairy products that were linked to illnesses across 11 states. Stick to hard cheeses unless you’re cooking the soft cheese in a recipe. Always wash your hands after handling soft cheese.
Eggs. Several large recalls last year involved eggs contaminated with salmonella. Eggs were also in short supply because of fears of the spread of bird flu. According to the Food and Drug Administration, you should buy eggs only if sold from a refrigerator or refrigerated case. Open the carton and make sure that the eggs are clean and the shells are not cracked. Store promptly in a clean refrigerator at a temperature of 40°F or below. Cook eggs until both the yolk and the white are firm. For recipes that call for eggs that are raw or undercooked when the dish is served — like Caesar salad dressing and homemade ice cream — use either shell eggs that have been treated to destroy salmonella, by pasteurization or another approved method, or pasteurized egg products.
Onions. Contaminated onions caused one death last year after many people were sickened by eating McDonald’s Quarter Pounders containing fresh, slivered onions. Buy fresh, whole onions and slice them yourself, discarding the first few layers that are most likely to be contaminated.
Leafy greens. Many forms of produce in the U.S. are grown next to cattle farms where irrigation water can cause bacterial outbreaks. Last year, fresh spinach and romaine-iceberg mixes caused two E. coli outbreaks. Lower your risk of illness by buying hydroponic lettuce. When using whole heads discard outer leaves.
Organic carrots. Grimmway Farms recalled organic bagged whole and baby carrots after they were connected to E. coli illnesses in 19 states. Here again, cooking is the safest way to protect yourself as washing and peeling can reduce bacteria but doesn’t remove all of it.
Organic basil. Fresh herbs can also fall victim to soil contamination and packaged organic basil was linked to a salmonella outbreak in 14 states last year. Rinse herbs and use them in cooking rather than adding them raw to dishes.
Cooked poultry and meat. Prepared foods go through a lot of processing before they hit the shelves, and each step increases the risk of contamination. Federal health officials found listeria in cooked poultry from BrucePac that lead to a massive recall of nearly 12 million pounds of ready-to-eat meat and poultry. Thoroughly heat all frozen foods and when buying packaged salads and sandwiches that contain meat make sure they’ve been refrigerated properly and keep them cold until you are ready to eat.
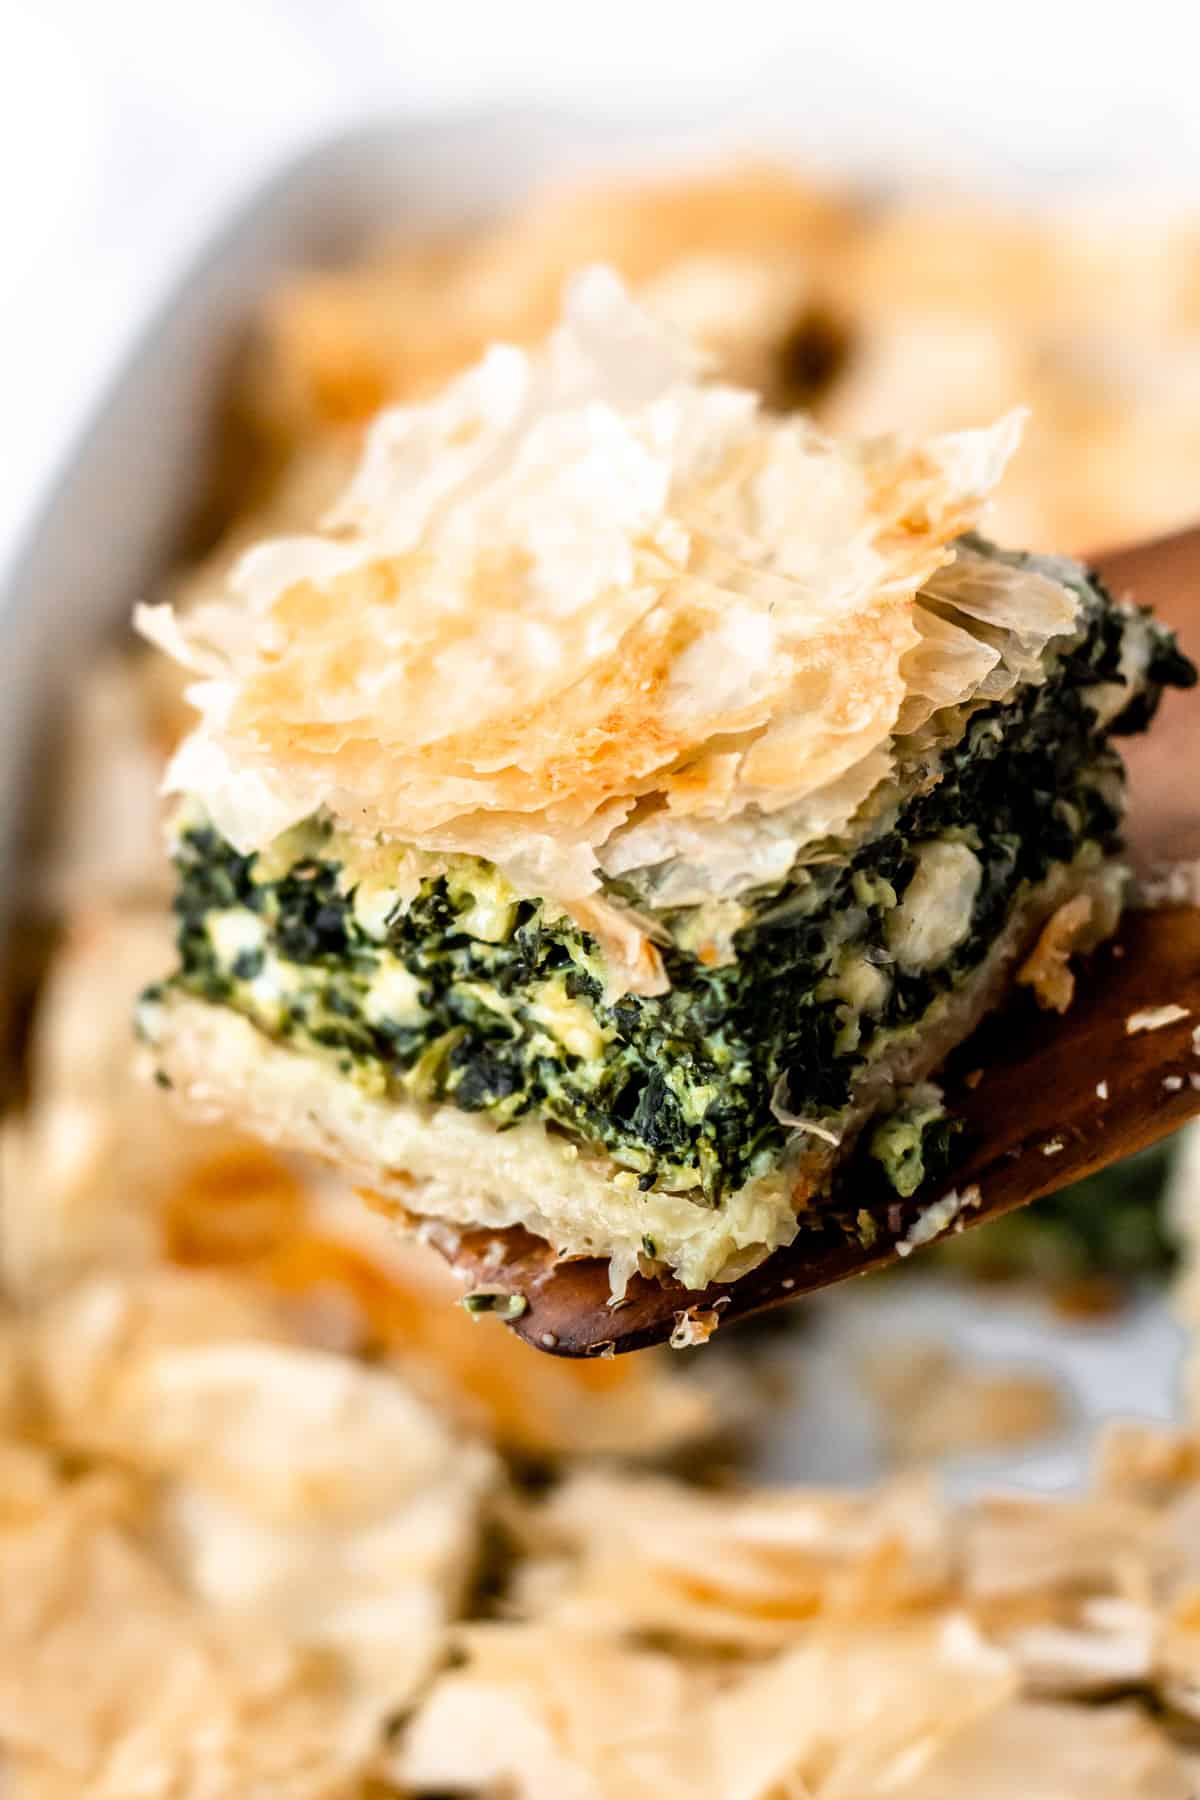
Spanakopita is a very popular, classic Greek recipe. It is a savory pie made with layers of crispy phyllo dough and filled with spinach and feta cheese. This comforting dish can be enjoyed as a vegetarian meal or as a side dish.
Heat the olive oil in a large, deep skillet over medium heat. Once hot, add the onion and cook until softened and starting to just lightly brown, about 3-5 minutes.
2 tablespoons extra virgin olive oil,1 medium onion
Stir in the spinach and cook until wilted.
2 pounds fresh spinach
Drain the spinach and onion mixture in a colander over the sink. Press the spinach to get as much of the liquid out of it as possible.
Return the spinach to the skillet and add the dill, parsley and lemon zest. Season with salt and pepper.
2 teaspoons dried dill,1/4 cup fresh parsley,1 lemon,salt,pepper
Cook until most of the liquid is gone, then stir in the feta cheese and eggs. Remove the skillet from the heat and set aside.
6 eggs,10 ounces feta cheese
Open the pack of phyllo dough and lay it out on a countertop or sheet pan. Cover with a damp towel.
16 ounce box phyllo dough
Melt the butter.
5 tablespoons butter
Brush a very thin layer of butter onto the bottom and sides of a 9×13-inch baking dish.
Place one sheet of phyllo dough into the bottom of the pan. Brush with a very thin layer of the melted butter.
Repeat this process until approximately 3/4ths of the dough is used.
Evenly spread all of the spanakopita filling over the phyllo dough in the baking dish.
Layer the remaining phyllo dough over the top of the filling, using the same method of brushing each piece with a thin layer of butter until all of the dough is used.
Fold any excess dough under. Brush the top of the pie with butter and cut three slits to allow steam to escape while baking.
Bake for approximately 1 hour or until the dough is golden brown and the filling is hot.
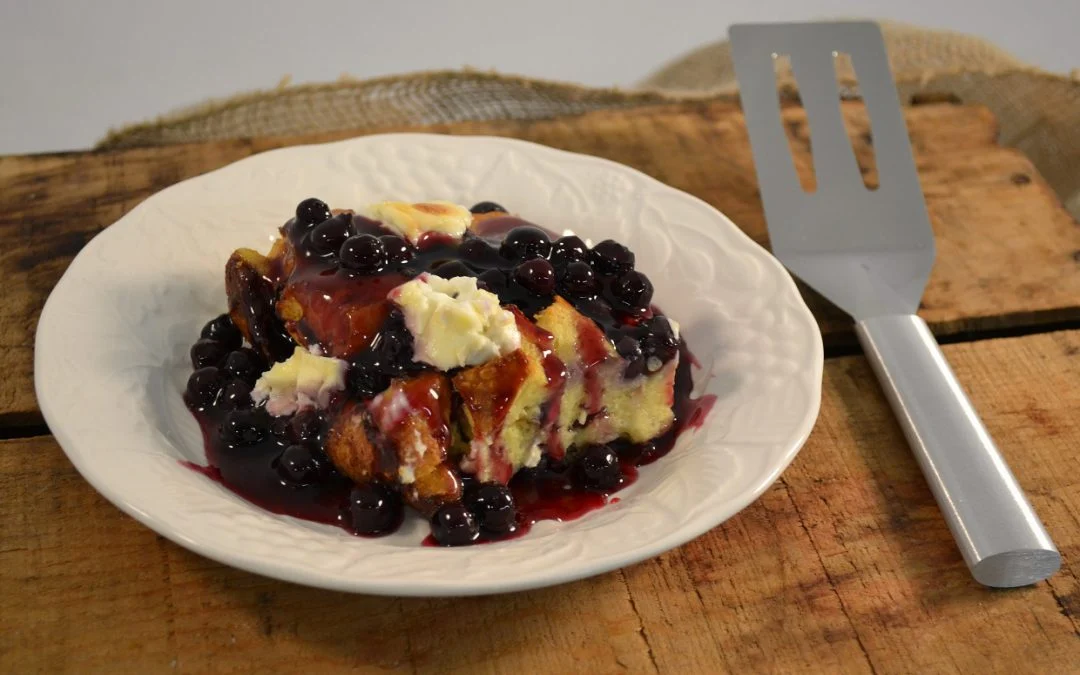
Blueberry French Toast Bake | Stuffed French Toast Recipe.
Make this incredible French toast casserole for a breakfast the whole family will love! This delightful take on classic French toast is loaded with fresh ingredients and heavenly cream cheese. It’s the perfect way to start the day and one your family will want again and again.
Ingredients you will need:
1 lb. brioche or French bread, cubed
2 (8 oz.) packages cream cheese, cubed
2 C. fresh or frozen blueberries
12 eggs
2 C. milk
1/3 C. honey or maple syrup
2 t. vanilla
1 C. sugar
2 T. cornstarch
Directions
Preheat your oven to 350 degrees. Cover the bottom of a 9″ x 13″ pan with half the bread cubes.
Top the bread cubes with cream cheese cubes.
Cover cream cheese cubes with remaining bread cubes.
Top bread cubes with 1 cup blueberries.
Make an egg mixture by combining eggs, milk, vanilla, and either honey or maple syrup. Coat the bread pieces with the egg mixture. Cover pan with foil and bake for 30 minutes. Remove foil, and bake another 30 minutes.
While the dish is baking, make your blueberry sauce. In a saucepan, bring 1 cup sugar, 2 T. cornstarch, and some cold water to a boil. Add 1 cup blueberries, drop the temperature, and simmer, stirring occasionally.
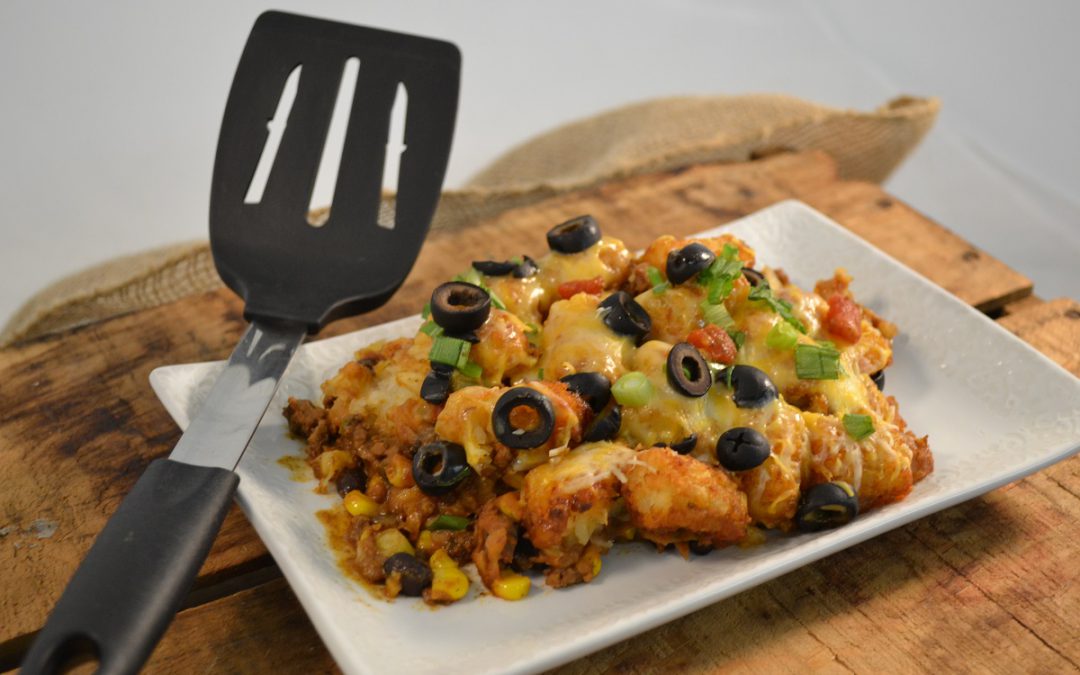
Whether you say “casserole” or a “hot dish,” there’s something comforting about a hot and homey meal. No weird ingredients, just simple, classic recipe the whole family will appreciate.
Ingredients:
1 1/2 lbs. ground beef
1 can black beans
1 can tomatoes with green chilies
2 packets taco seasoning
1 onion, chopped
1 green pepper, chopped
3 cloves garlic, chopped
1 pkg. frozen corn
2 cans fat-free refried beans
1 pkg. shredded Mexican-blend cheese
3 green onions, chopped
1 can sliced black olives
1 pkg. frozen tater tots
Directions:
Preheat oven to 425 degrees. Brown 1 1/2 lbs. ground beef, breaking it up as you go.
Add 2 packets taco seasoning, 1 chopped onion, 1 chopped green pepper, and 3 cloves chopped garlic to the ground beef.
Add 1 can tomatoes with chilies.
Add 1 can black beans. Cook until meat is browned and vegetables are tender.
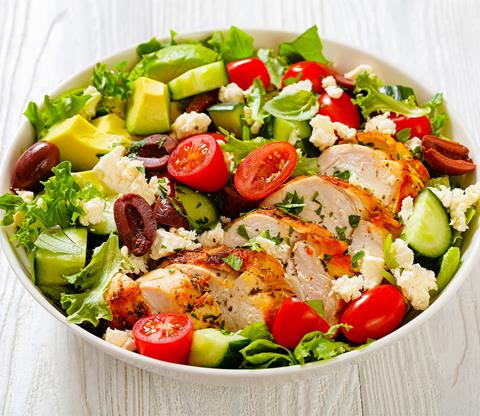
For a lighter lunch, toss together Greek Grilled Chicken Salad. Mediterranean ingredients like Feta cheese and Kalamata olives give this salad plenty of flavor.
Ingredients
2 boneless skinless chicken breasts
1 tsp. ground coriander
1/2 tsp. dried oregano
1/2 tsp. salt
1/2 tsp. freshly ground black pepper
1/4 cup olive oil
1/4 cup red wine vinegar
2 romaine hearts, chopped
1 cucumber, thinly sliced
1 cup cherry tomatoes, halved
2 avocados, sliced
4 oz. crumbled Feta cheese
1/2 cup Kalamata olives, halved
Instructions
Preheat grill to medium-high heat.
Season chicken evenly with coriander, oregano, salt and pepper. Grill for 14 to 17 minutes, turning halfway through. Let rest 5 minutes, then slice and set aside.
In a medium bowl, whisk together oil, red wine vinegar and parsley. Season with salt and pepper, to taste.
Place lettuce, cucumber, tomatoes, avocado, Feta and olives in a large bowl. Top with grilled chicken slices and drizzle with dressing.
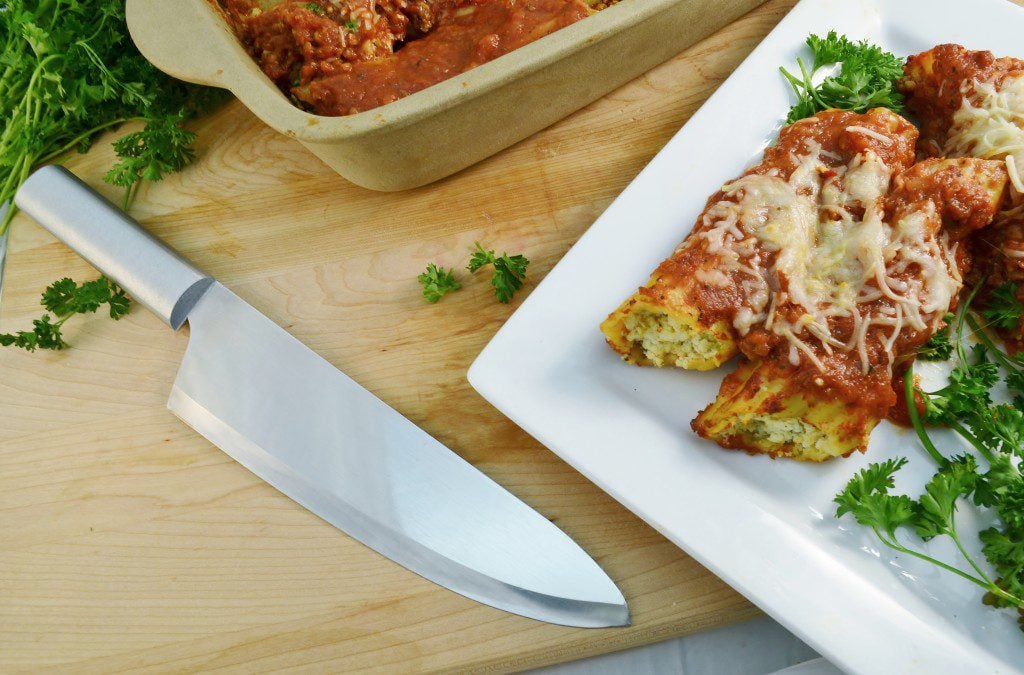
Cheese Filled Sausage Manicotti Noodles | Italian Casserole Recipe.
Whether you say “casserole” or a “hot dish,” there’s something comforting about a hot and homey meal. No weird ingredients, just simple, classic recipes the whole family will appreciate.
Ingredients.
1/2 lb. bulk spicy Italian sausage
1 15 oz. can crushed tomatoes
1 1/2 cup marinara sauce
1 egg (beaten)
1 1/2 cup ricotta cheese
1/3 cup grated Parmesan cheese
1 4 oz. can diced green chilies
1 1/2 teaspoon chopped fresh parsley
1/2 teaspoon Italian sausage
1/4 teaspoon salt
1/4 teaspoon garlic powder
1/4 teaspoon pepper
12 uncooked manicotti shells
1/4 cup shredded mozzarella cheese
Directions.
In a large pan or skillet, cook 1/2 lb. ground Italian sausage. Once it is done, place on a plate where it should drain over a paper towel.
Add 1 (15 oz.) can crushed tomatoes to the same pan.
Add 1 1/2 cup marinara sauce.
Once it comes to a boil, reduce heat, cover, and let simmer for 10 minutes.
In a large bowl, place 1 1/2 cup ricotta cheese.
Add 1 beaten egg to ricotta cheese.
Add 1 (4 oz.) can diced green chilies.
Add 1/3 cup grated Parmesan cheese.
Mix thoroughly.
Chop 1 1/2 tablespoon fresh parsley. The Rada French Chef knife is incomparable when it comes to chopping parsley.
Add parsley to mixture.
Add 1/2 teaspoon of Italian seasoning, 1/4 teaspoon of salt, 1/4 teaspoon of pepper, and 1/4 teaspoon garlic powder. Mix.
Take a 1 gallon size freezer bag and place the filling inside.
With a pair of scissors, cut a quarter inch space in the bag. Have a 9″ x 13″ pan ready.
Gently squeeze the freezer bag, pushing the filling into the manicotti. Try putting the filling in both sides of the manicotti for best results. Repeat until all manicotti are filled or filling is used up.
In 9 x 13 pan, take 1 cup of prepared sauce and spread evenly across bottom of the pan.
Place manicotti shells on top of the sauce.
Sprinkle cooked sausage over shells.
Pour remaining sauce over manicotti shells and sausage.
Cover pan completely with aluminum foil. Bake in pre-heated 375 degree oven for 50 minutes.
Remove manicotti from oven. Add 1/4 cup shredded mozzarella cheese to top. Put back in oven uncovered for 10 minutes.
What’s better than Guinness beer on St. Patrick’s Day? Not much! We’re making a delicious dip with beer, Irish cheese, and cream cheese all mixed together for a delicious snack to eat on the holiday. Serve this with soft pretzels for a yummy treat!
In a medium bowl, whip together the softened cream cheese with beer, Worcestershire sauce, mustard, garlic powder, and salt until smooth. Add cheese and stir until combined. Transfer to a serving bowl and refrigerate for at least two hours before serving. Top with green onions and enjoy with soft pretzels.
Season chicken thighs with salt and pepper. Melt 2 tablespoons butter in a large ovenproof skillet over medium-high heat. Add chicken, skin-side down, and sear both sides for 2 to 3 minutes or until golden brown; set aside.
Melt remaining butter in the skillet. Add garlic and red pepper flakes, and cook for 2 minutes or until fragrant. Stir in chicken broth, heavy cream, sun dried tomatoes, Parmesan, thyme, oregano and basil. Bring to a boil; reduce heat and simmer for 3 to 5 minutes or until slightly thickened. Return chicken to the skillet. Place into oven and roast for 25 to 30 minutes. Serve immediately and garnished with basil leaves.
chicken to the skillet. Place into oven and roast for 25 to 30 minutes. Serve immediately and garnished with basil leaves.
Make these amazing steak crostini for an appetizer that will impress and delight everyone! Featuring wonderful French bread topped with succulent steak, this is a fancy finger food hit that’s perfect for all occasions. It’s a delicious steak hors d’oeuvre that’s sure to impress! Check out our video and instructions below to learn how to make this delicious, easy party appetizer!
Ingredients.
1 1/2 lbs. sirloin, cooked medium-rare
olive oil, extra virgin
10 oz. blue cheese
3 T. milk
3 cloves garlic, chopped
2 green onions, thinly sliced
1 French baguette, thinly sliced
rosemary, chopped
Salt and pepper
Directions.
Season steaks with salt, pepper, and oil. Let rest for 45 minutes.
In a pan, combine the garlic, milk, and blue cheese. Simmer on low, stirring occasionally.
Slice French baguette into thin slices and brush with olive oil. Cook in 350 degree oven for 5-7 minutes or until lightly toasted.
Cook the steaks to your liking. We prefer ours cooked medium-rare. Let the steaks rest for a few minutes after cooking. Then cut the steak into thin slices,
Add the green onions to the sauce. Stir until combined.
Spread the blue cheese sauce on the toasted bread. Then place a piece of steak on top of the sauce. Garnish with fresh rosemary. Serve and enjoy!
Did you know crostini means “little toasts” in Italian. Crostini are small, thin slices of toasted bread which can be topped with any combination of spreads and toppings.
melted chocolate pouring into a piece of chocolate bars with green mint leaf on a table
Views: 16
How about a chocolate treat?
There’s nothing quite like chocolate. Indulge your taste buds with this decadent recipe.
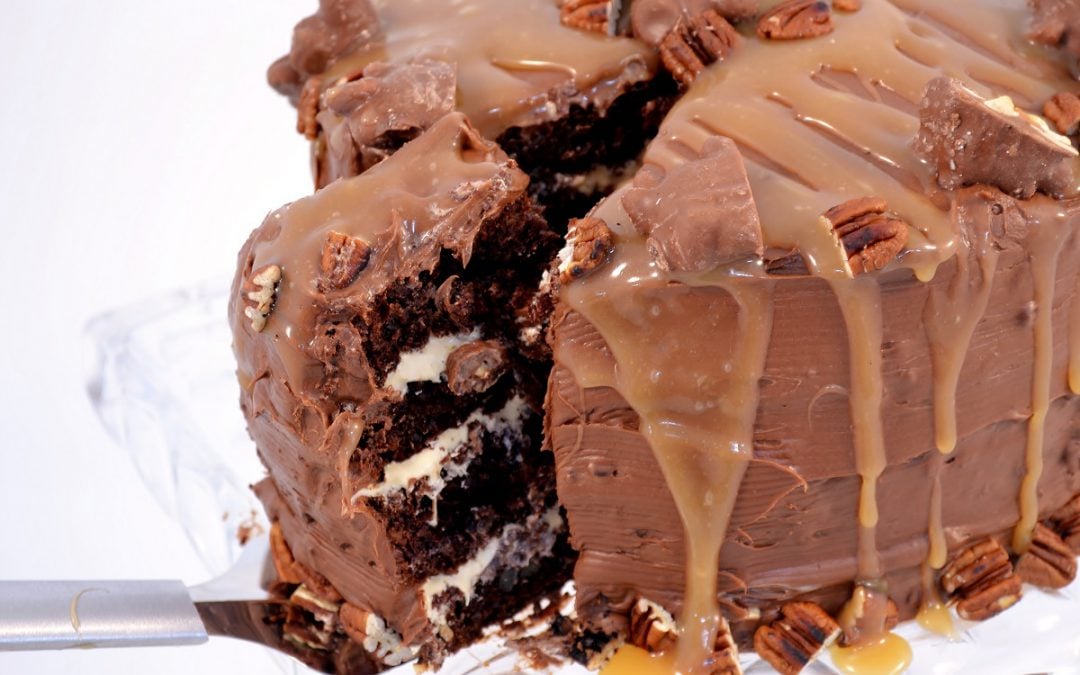
Chocolate Turtle Cake.
Skip the bakery and make an incredible, opulent chocolate turtle cake at home. Layers of chocolate and frosting topped with caramel and turtle pieces make for a heavenly dessert that everyone will love. Take a look at the video or written instructions below to learn how to make this unbelievable chocolate cake for your friends and family!
1 (16 oz.) can ready-to-spread chocolate fudge frosting
2 t. vanilla extract
1 pkg. semi-sweet chocolate morsels
1 jar caramel ice cream topping
1/4 C. whole pecans, toasted
Directions.
Preheat oven to 350 degrees. Grease two 9″ cake pans and dust with cocoa.
In a mixing bowl, add the cake mix, eggs, milk, vegetable oil, and vanilla extract and beat for 1 minute.
Add instant pudding and beat again for 2 minutes.
Fold in chocolate morsels and chopped pecans.
Pour the batter into the prepared cake pans. Bake for 30 to 32 minutes, or until a toothpick inserted in the center comes out clean.
Cool the pans on wire racks for 10 minutes, then remove from pans to wire racks and cool completely.
Wrap and chill the cake layers for at least 1 hour.
Whisk together cream cheese frosting and dulce de leche in a small bowl.
Take packages of turtle candies and cut 6 in half and set aside for the garnish. Dice the remaining turtle candies.
Using a serrated knife, slice cake layers in half horizontally and make 4 layers.
Place 1 layer cut side up on a cake plate. Spread with ½ cup of cream cheese frosting mixture and sprinkle with 1/3 of the diced turtle candies.
Repeat this twice.
Place the final cake layer on top of the cake cut side down.
Spread chocolate fudge frosting on the top and sides of the cake. Spread and chill in refrigerator until ready to serve.
Before serving, drizzle caramel ice cream topping over the top of the cake. Garnish with the remaining candies and pecan halves. Store in the refrigerator.
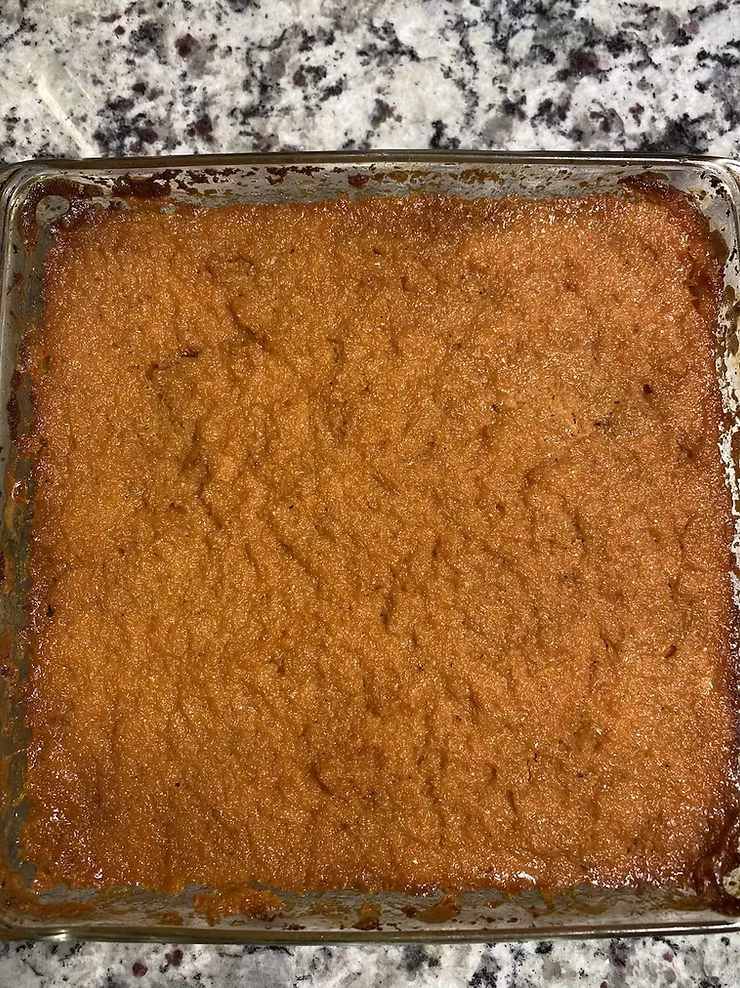
An old fashioned grated sweet potato pudding is a labor of love. The hardest part is grating the sweet potatoes which my mother always did by hand. You can certainly a food processor but it is key to grate the sweet potatoes really fine. You don’t want to boil or bake the sweet potatoes because it changes the texture of the dish. If you have the time, this dish is certainly one that you should have on your holiday dessert table.Enjoy it as a dessert but you can also make it as a side dish.
Ingredients.
Here are the basic ingredients that you will need to make Old-Fashioned Grated Sweet Potato Pudding:
1 cup sugar
3 tablespoons melted butter
1 cup milk
1 egg
2 cups grated sweet potato, about 2 to 3 medium size potatoes
1 teaspoon vanilla
1/4 teaspoon nutmeg
1/4 teaspoon cinnamon
Directions.
To make Old-Fashioned Grated Sweet Potato Pudding, simply…
1 Using a hand grater or food processor, grate 2-3 sweet potatoes into an 8×8 Pyrex baking dish.
2 Mix all ingredients until well combined with the grated sweet potatoes. Bake in a preheated 350-degree oven, 1-1/2 to 1 hour and 45 mins. Bake until brown on top and the corners are crispy. If serving as a dessert, top with whipped cream.
Carlena Davis is a culinary content creator, foodie, cookbook author, children’s book author, jam and biscuit maker all rolled into one. In July 2017, she started her food blog, Spilling the Sweet Tea, combining her love for Southern cuisine and quick & delicious recipes for the entire family to enjoy.
In 2020, Carlena launched Miss Lena’s Brand starting with her peach & raspberry preserves, shipping across the United States. Carlena followed up her successful jam launch with her Miss Lena’s Buttermilk and Sweet Potato biscuit mixes and has now expanded the brand to include her signature Miss Lena’s Biscuit bowl.
She is a North Carolina native and currently lives on the East Coast with her husband and daughter, where she spends time in her home kitchen creating new recipes and reimagining classic recipes with a twist!
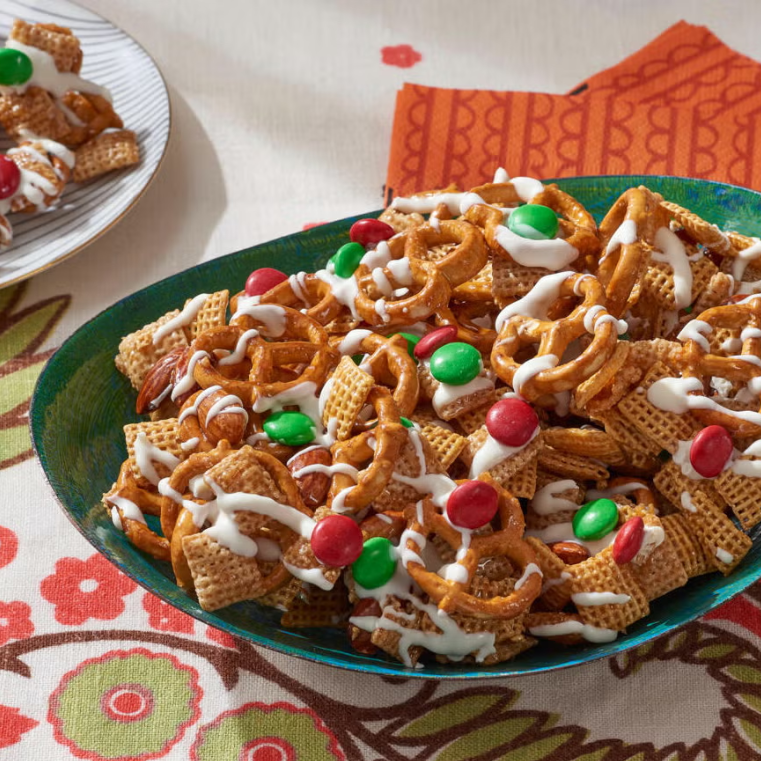
cups corn and/or rice cereal squares (such as Chex)
2c.
mini pretzels
1c.
salted roasted almonds
4Tbsp.
salted butter
1/4c.
honey
1/4c.
sugar
1tsp.
ground cinnamon
1tsp.
vanilla extract
1/2c.
white chocolate chips
2tsp.
coconut oil
1c.
red and green M&M’s
Directions:
Preheat the oven to 250˚F. Line a rimmed baking sheet with parchment paper. In a large bowl, combine the cereal, pretzels, and almonds.
2In a small saucepan, melt the butter with the honey and sugar over low heat until the mixture is bubbling and well combined, about 2 minutes. Add the cinnamon and vanilla and stir until well combined. Pour half of the butter mixture over the cereal mixture and toss until well coated. Add the remaining butter mixture and toss again until evenly coated.
3Spread the mixture on the baking sheet in an even layer. Bake, stirring every 15 minutes, until toasted and just starting to dry out, about 1 hour.
4Combine the white chocolate chips and coconut oil in a small microwave-safe bowl. Microwave at 50% power in 30-second intervals, stirring between each interval, until melted and smooth.
5Drizzle the white chocolate over the snack mix on the baking sheet, then immediately sprinkle with the M&M’s. Let cool completely so the white chocolate sets, about 30 minutes. Break into small clusters.
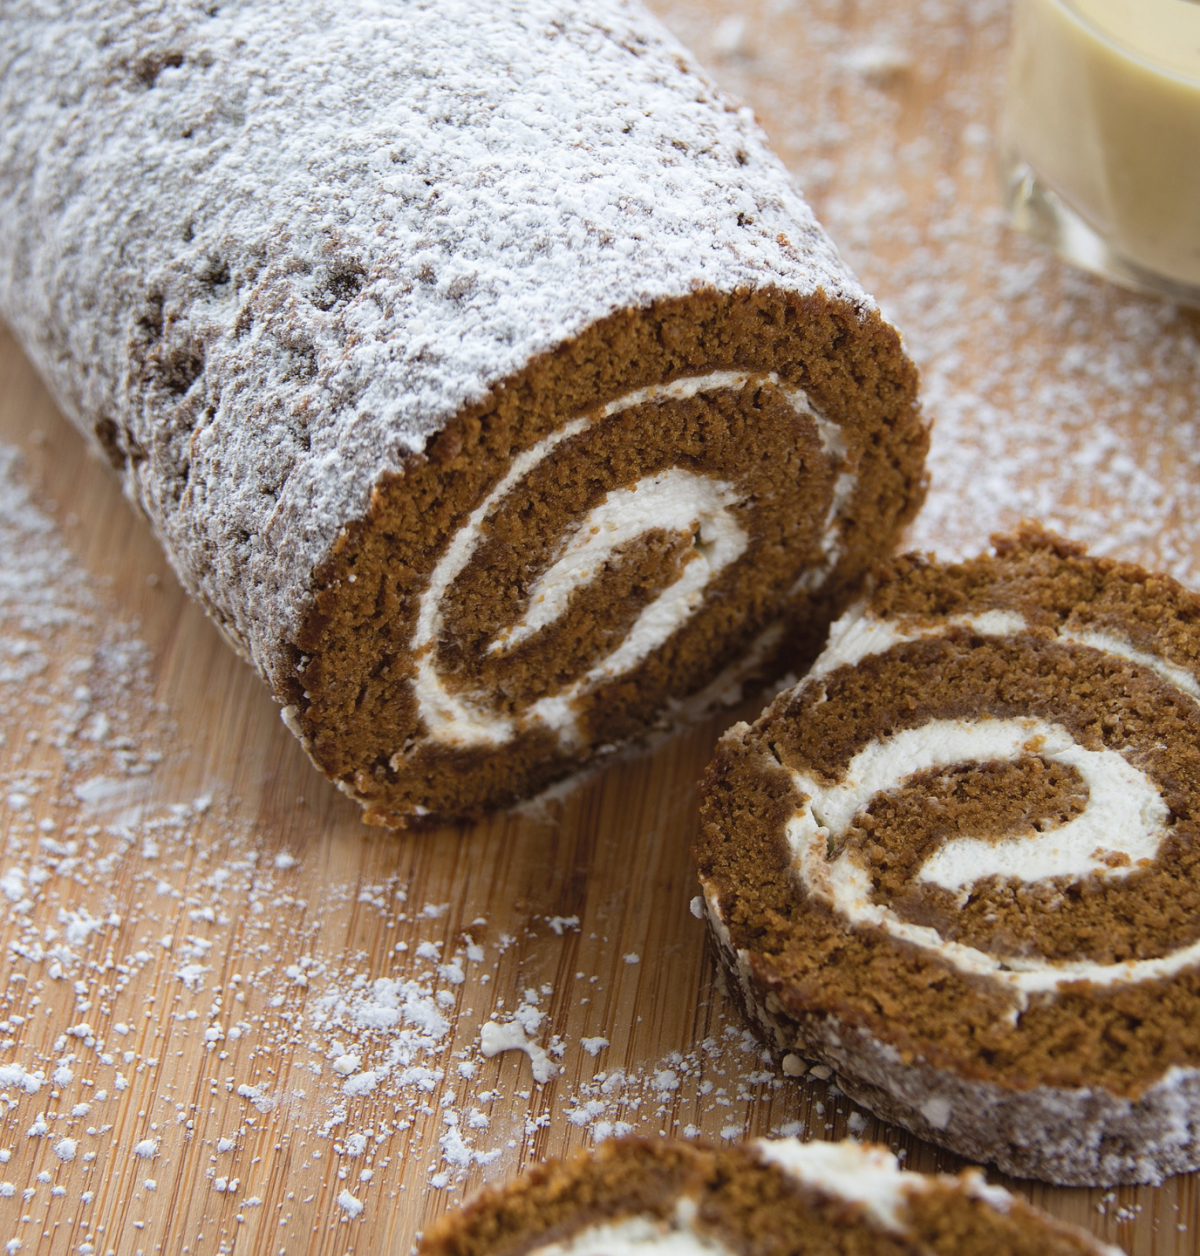
Line a 10×15″ jelly roll pan with parchment paper.
Beat eggs for 5 minutes. Beat in the remaining ingredients.
Spread the batter into the prepped pan and bake until done.
Immediately turn the cake out onto a powdered sugar-coated kitchen towel and remove the parchment paper.
Roll up the towel and cake together and let stand until cool.
Make the filling.
Unroll the cooled cake and spread the filling over the top.
Roll the cake around the filling without the towel and chill before slicing.
INGREDIENTS (Serves 10)
For the Cake: 3 eggs
½ C. sugar
¼ sugar-free applesauce
½ C. molasses
1 C. flour
1 tsp. baking powder
2 tsp. ground cinnamon
½ tsp. ground allspice
1 tsp. ground ginger
½ tsp. salt
Powdered sugar
For the Filling:
1 C. heavy cream
2 T. powdered sugar
½ tsp. clear vanilla
5 T. eggnog
DIRECTIONS
Preheat your oven to 350°. Spritz a 10×15ʺ rimmed baking sheet with cooking spray, line with parchment paper, and spritz the paper. Set aside.
For the cake, in a big mixing bowl, beat the eggs on high speed for 5 minutes. Gradually beat in the sugar, applesauce, and molasses. In a separate bowl, stir together the flour, baking powder, cinnamon, allspice, ginger, and salt; add to the egg mixture. Beat until blended, and spread evenly in the prepared pan.
Bake 15 to 18 minutes, until done. Immediately turn the cake out onto a kitchen towel sprinkled liberally with sifted powdered sugar; remove the paper. Starting at a narrow end, carefully roll up the towel and the cake together and let stand for a couple of hours until cool.
For the filling, beat the cream, powdered sugar, and vanilla until soft peaks form. Add the eggnog a little at a time, beating until stiff peaks form.
Carefully unroll the cooled cake and spread about half the whipped cream evenly over the top; reroll the cake without the towel. Chill at least 2 hours and up to 24 hours before slicing. Serve the cake with the remaining whipped cream.
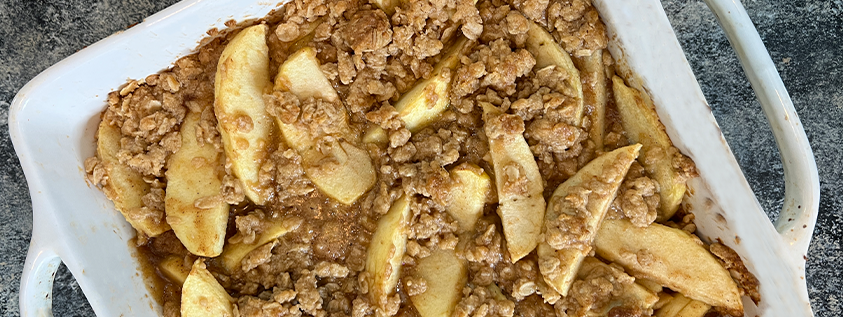
When it comes to fall, one of the most traditional and favorite recipes is apple crisp. It’s just the most perfect dessert for this time of year. Crisp apples with a crumbly oat topping is just so easy to make and will definitely satisfy your sweet tooth.
Ingredients
3tart applescored, peeled and sliced
1tbsplemon juice
1tspvanilla extract
3tbspbuttermelted
2tbspall-purpose flour
3tbspmilk
1/3cupbrown sugar
1/2tspground cinnamon
1/8tspground nutmeg
1/8tspallspice
1/8tspsalt
Topping
3/4cuprolled oats
2/3cupall-purpose flour
1/2tspground cinnamon
3/4cupbrown sugar
1/3tspbaking powder
1stickbuttersoftened and cut into small pieces
1/8tspsalt
whipped cream, ice cream or caramel saucefor serving
Instructions
Preheat oven to 375º. Layer apple slices in the bottom of an 8×8-inch baking dish coated with nonstick cooking spray. In a medium bowl, mix milk, lemon juice, vanilla extract, cinnamon, nutmeg, allspice, brown sugar, flour and butter. Pour mixture overtop apples and mix.
Mix flour, rolled oats, baking powder, salt, ground cinnamon and brown sugar in a large bowl. Add butter pieces and mix until it resembles small crumbs. Sprinkle overtop apples and toss to coat. Bake for 25 to 30 minutes. Serve warm with whipped cream or ice cream and top with caramel sauce.
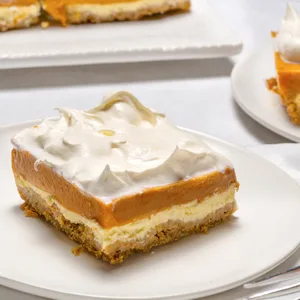
Preheat oven to 350°. In a small bowl, combine the crumbs, sugar and butter. Press onto the bottom of an ungreased 13×9-in. baking dish; set aside. In a large bowl, beat cream cheese and sugar until smooth. Add eggs; beat on low speed just until combined. Pour over crust. Bake until center is almost set, 25-30 minutes.
Meanwhile, in a small bowl, sprinkle gelatin over cold water; let stand for 1 minute. In a large saucepan, combine pie filling and evaporated milk. Bring to a boil. Add gelatin; stir until dissolved. Whisk a small amount of hot mixture into the eggs. Return all to the pan, whisking constantly.
Cook and stir over low heat until mixture is thickened and coats the back of a spoon. Cool for 10 minutes. Spread over cream cheese layer. Spread whipped topping over top. Cover and refrigerate overnight.
Pumpkin Torte Recipe Variations
Use a shortbread cookie crust: Swap the traditional graham cracker crust for a crumbly shortbread cookie crust to impart buttery flavors into this torte.
Swap the pumpkin: In the fall you can use a variety of seasonal squashes or root vegetables. Consider substituting the pumpkin for sweet potato or butternut squash.
Top with sauce: Drizzle chocolate over this pumpkin torte for a more decadent dessert.
I’ll take my eggs in just about any way, shape, or form, but a fried egg has long been my favorite. Fried eggs are almost foolproof to make and can turn just about anything into a hearty meal, from a pile of sautéed gr
How to Cook a Fried Egg, Spanish-Style
To prepare a Spanish fried egg, pour about 1/4-inch of olive oil into a small, heavy skillet. Heat it over medium-high heat until it’s extremely hot (but not smoking). Crack 1 egg into a ramekin or mug. When the oil is hot, carefully slip the egg in and reduce the heat to medium-low. Then spoon some of the oil over the egg as it cooks. Remove the egg with a slotted spoon after no more than 1 1/2 minutes (when the white puffs and becomes crispy and golden-brown around the edges, and when the yolk still jiggles). Serve sprinkled with a bit of flaky salt and freshly ground black pepper